

Using different icon fonts
Introduction
We all know that Stacks3 ships with FontAwesome icons built in. ButtonPlus2 and MagicGellan2 naturally support these for use with Combi, Split, and Icon buttons.
You will notice that beneath the familiar input for the icon name that there is another input labelled Icon Set. The icon set prefix is the class name used to identify all icons in a particular set. For FontAwesome, this prefix is fa. So, for example, when adding a home icon with the name of fa-home, the class names that you would write manually would actually be fa fa-home.
Most stacks either just give you some pre-defined icon names in a dropdown or let you type in the "fa-home" part.
ButtonPlus2 and MagicGellan2 however also allow you to change the prefix. It defaults to fa so FontAwesome works out of the box. If however you want to use a different icon font that you have loaded, or even create your own, you can simply change the prefix.
Using a pre made icon font
For example, if you have linked to and loaded the IonIcons set, then the class name for the iOS style home icon is ion-ios-home. In the case of IonIcons the prefix is icon.
So to use the iOS Home icon in your stack you would simple enter
Icon Name: ion-ios-home
Icon Set: icon
IonIcons can be loaded from their CDN at http://code.ionicframework.com/ionicons/2.0.1/css/ionicons.min.css
NOTE: Be careful if you are loading more than one icon font
- Multiple instances of common pre-fixes such as icon will cause a conflict and your browser will not know which to display
- Do not unnecessarily load lots of large font files (this applies to any font not just icons). If necessary, just subset the icons that you need and only load these. (See instructions below).
Using your own custom made icon font
Step1: Making a font file
There are several font creation apps that you can use to create icon fonts but these tend to be quite expensive.
Luckily, there are now several free services which allows you to do it, all you need is your icons as SVG files. You can read more about them here.
We are going to use Glyphter for this example and here are the simple steps to do it.
Visit https://glyphter.com
Add as many icons as you want by clicking on the boxes and loading an SVG file for as few or as many letters as you want.
Each time, a window will appear on the left where you can enter the Class Name. This is our icon name, analogous to the fa-home example from FontAwesome.
Here, you can see we have loaded an icon for the BWD blog and simply called it blog-icon

Click the cog button at the top to set your font name and prefix
Here is an example
![]()
As you can see, we have given the prefix a unique name (and changed it from the default icon to ensure we have no conflicts.
The font name is the name of the font that you will load. This is just like any other font such as Proxima-Nova or even Comic Sans (forbid the thought).
Our font is now created and we can download it by clicking the Font button 
You do not need to sign up if you don't want to - just hit the Download Now button.
Step 2: Adding the font to your RapidWeaver project
In your downloads folder, you will now have a folder called glyphter-font
Rename this folder to something more memorable.
Inside this folder are two more folders: css and font
The font folder contains the actual font file itself. You will see multiple types (EOT, TTF, SVG and WOFF). We will just use the WOFF file as it is supported in all modern browsers.
The CSS folder contains the class names that we can use to access the font.
First the CSS
Open the CSS file provided in a text editor and simply paste it all into your Site-Wide CSS code in RapidWeaver.
This CSS defines the font family and the class names that we use to refer to each icon.
Remember to paste as plain text when pasting anything into RapidWeaver
OPTION 1: Use FontPro to Load the font
If you want to use FontPro, you can completely delete the @font-face code all the way down to the closing } (as shown in the first code block below). Just upload your font to your server and treat it like any other font in FontPro.
Note: you will still need to add the classname CSS so don't delete that part
OPTION 2: Load the font with the code Glyphter provided
You will now need to edit the URL to your font file. You have 2 options here.
- Either self host the font on your server, just like any other webfont
- Convert it to base64 and enter it into your page CSS directly.
To self host, simply FTP the font file to your server and edit the CSS to reflect the correct path.
If, as recommended, you are only using the WOFF file you can delete all the other URLs. Here is what the top part of the as downloaded file looks like fresh from Glyphter:
@font-face {
 font-family: 'duck icons';
 src: url('../fonts/duck-icons.eot');
 src: url('../fonts/duck-icons.eot?#iefix') format('embedded-opentype'),
 url('../fonts/duck-icons.woff') format('woff'),
 url('../fonts/duck-icons.ttf') format('truetype'),
 url('../fonts/duck-icons.svg#duck-icons') format('svg');
 font-weight: normal;
 font-style: normal;
}
First, just delete the .eot definition completely (the first src: line up to an including the semi-colon.
Next delete all the url definitions except the woff one. Make sure that the line ends in a semicolon and you have removed all the commas between the definitions.
Here is how it should look now, nice and simple:
@font-face {
 font-family: 'duck icons';
 src: url('http://myserver.com/myfont/duck-icons.woff') format('woff');
 font-weight: normal;
 font-style: normal;
}
don't forget you will also have the classname definition below it from the original Glyphter file. You don't need to modify this at all.
[class*='bwd-']:before{
display: inline-block;
 font-family: 'duck icons';
 font-style: normal;
 font-weight: normal;
 line-height: 1;
 -webkit-font-smoothing: antialiased;
 -moz-osx-font-smoothing: grayscale
}
.bwd-blog-icon:before{content:'\0041';}
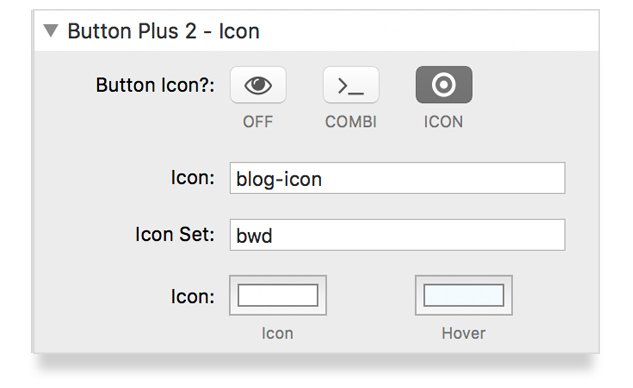
Now, to use our icon, we simply enter the prefix of bwd and the Icon Name of blog-icon like so:
Using Base64 (b64) files
This method means that you do not need to host the font file on your server. It will be included in the site CSS and will always stay with your project.
Again the easiest way to do this is to use the FontPro font family stack and simply paste in the b64 code.
Because the code for just a few icons is tiny, there is no problem with including it in your sites CSS and it will save an external http: request.
STEP 1: Convert the font
Again, this is super simple and can be done online. There are several web pages that allow you to do this. My favourite is:
Gift Of Speed: https://www.giftofspeed.com/base64-encoder/
The site will just generate a text string that you should copy to your browser.
If you are using FontPro, simply paste this text into an Inline Font child stack.
If you want to manually load the b64 yourself from CSS, then use the Glyphter @font-face CSS as above but change the url line to include your b64 text as follows
src: url(data:application/x-font-woff;charset=utf-8;base64,PASTE-YOUR-b64-TEXT-HERE);
So your @font-face declaration should look like this:
@font-face {
 font-family: 'duck icons';
 src: url(data:application/x-font-woff;charset=utf-8;base64,PASTE-YOUR-b64-TEXT-HERE);
 font-weight: normal;
 font-style: normal;
 }